#steps for testing a mobile app
Explore tagged Tumblr posts
Visit Tumblr Blog
Explore Tumblr blogs with no restrictions, modern design and the best experience.
Last Seen Tumblr Blogs


Fun Fact
Tumblr posted its first advertisements in May 2012 and subsequently earned $13M in revenue.
Text
Mastering Mobile App Localization: The Ultimate Guide
#In an increasingly globalized world#mobile app localization is crucial for developers aiming to expand their reach and connect with international markets. Localization involve#content#and functionality to suit different languages#cultural nuances#and regional preferences. This comprehensive guide will walk you through the steps of effective mobile app localization#ensuring your app resonates with users around the world.#1. Understand Your Target Audience#Before diving into localization#it's vital to thoroughly understand the markets you are targeting. Research the languages spoken#cultural norms#legal requirements#and local technologies. This foundational knowledge will guide your localization strategy and help you prioritize which elements of the app#2. Internationalize Your App#Internationalization is the process of designing an app's architecture so that it can support multiple languages and regions without requir#text directions (like right-to-left scripts)#local date and time formats#and numerical values. Preparing your app in this way simplifies the subsequent localization process.#3. Localize Content and UI#The next step is to translate and localize the app’s content and user interface. This goes beyond mere translation; you must also adapt gra#icons#and layouts to align with local customs and expectations. It’s advisable to work with native translators who understand the linguistic subt#4. Adapt to Local Regulations and Legal Requirements#Different markets may have specific legal standards regarding data privacy#digital transactions#and censorship that can affect your app. Ensure that your app complies with local laws and regulations to avoid legal issues and build trus#5. Test and Optimize for Local Markets#Once localized#thoroughly test your app in each target market to catch any issues with translations#or functionality. Consider conducting usability tests with local users to gather feedback and understand their user experience. Use this fe
0 notes
Text
People should really consider using Tumblr mobile web instead of the app. It means your Tumblr account isn't directly beholden to app store companies, ie Apple and Google, so it hasn't experienced the automatic user settings changes to suppress mature content that ios and android users have both now experienced.
You're also taking your business away from app stores by using mobile web, especially if you pay for a tumblr subscription via an app store (I mean, idk who does lol but just saying). You'd still be using a browser app of course but you can choose which browser fits your needs & privacy level preferences (including choosing not to use Chrome), and deleting the Tumblr app is one less app downloaded, one less app scraping your personal information. It obviously doesn't impact what content is labeled as mature, but it's a drop in the bucket as far as making your Tumblr account one extra step removed from app store control.
Mobile web is the neglected stepchild of Tumblr updates, too, and that's a great thing lmao. The updates we do get are the ones that are more solid quality-of-life improvements and better tested before they get released, in my experience anyway.
Mobile web usually doesn't get all the flashy new updates right away or frequent UI changes that the apps get (I hate that kind of stuff so it's a plus for me lol), I find the UI much more straightforward and simple from my brief flings with the app, and experiences less bugginess from what I read on the @/changes official account.
So, app store is making it more difficult to access adult content? Don't use the app!
94 notes
·
View notes
Text
YouTube Downloads through VLC: Step by Step
[EDIT: I've been receiving reports for some time now that this method no longer works. I suspect something about the switch to YouTube Music as a separate app, and/or YouTube's ongoing attempts to force Chrome use, broke the compatibility with the Github version of youtube.luac -- I haven't managed to look into whether there's an updated working version out there yet. Sorry!]
So this guide to easily downloading off YouTube is super helpful, but there's enough important information hidden in the reblogs that (with the permission of OP @queriesntheories ) I'm doing a more step-by-step version.
Please note: these downloads will be in YouTube quality. My test video download is coming through at 360p, even though the video I'm starting from is set to 720p. They're legible, but they won't look great on a TV. For high visual quality, you'll want to seek out other methods.
This guide is written for Windows 10, since that's what I can test on. It's been tested on Firefox, Chrome, and Edge (which is a Chromium browser, so the method should work in other Chromium browsers too). So far, I haven't tracked down a way to use this download method on mobile.
BASIC KNOWLEDGE:
I'll try to make this pretty beginner-friendly, but I am going to assume that you know how to right-click, double-click, navigate right-click menus, click-and-drag, use keyboard shortcuts that are given to you (for example, how to use Ctrl+A), and get the URL for any YouTube video you want to download.
You'll also need to download and install one or more programs off the internet using .exe files, if you don't have these programs already. Please make sure you know how to use your firewall and antivirus to keep your computer safe, and google any names you don't recognize before allowing permission for each file. You can also hover your mouse over each link in this post to make sure it goes where I'm saying it will go.
YOU WILL NEED:
A computer where you have admin permissions. This is usually a computer you own or have the main login on. Sadly, a shared computer like the ones at universities and libraries will not work for this.
Enough space on your computer to install the programs listed below, if you don't have them already, and some space to save your downloaded files to. The files are pretty small because of the low video quality.
A simple text editing program. Notepad is the one that usually comes with Windows. If it lets you change fonts, it's too fancy. A notepad designed specifically to edit program code without messing it up is Notepad++, which you can download here.
A web browser. I use Firefox, which you can get here. Chrome or other Chrome-based browsers should also work. I haven't tested in Safari.
An Internet connection fast enough to load YouTube. A little buffering is fine. The downloads will happen much faster than streaming the entire video, unless your internet is very slow.
VLC Media Player, which you can get here. It's a free player for music and videos, available on Windows, Android, and iOS, and it can play almost any format of video or audio file that exists. We'll be using it for one of the central steps in this process.
If you want just the audio from a YouTube video, you'll need to download the video and then use a different program to copy the audio into its own file. At the end of this post, I'll have instructions for that, using a free sound editor called Audacity.
SETUP TO DOWNLOAD:
The first time you do this, you'll need to set VLC up so it can do what you want. This is where we need Notepad and admin permissions. You shouldn't need to repeat this process unless you're reinstalling VLC.
If VLC is open, close it.
In your computer's file system (File Explorer on Windows), go to C:\Program Files\VideoLAN\VLC\lua\playlist
If you're not familiar with File Explorer, you'll start by clicking where the left side shows (C:). Then in the big main window, you'll double-click each folder that you see in the file path, in order - so in this case, when you're in C: you need to look for Program Files. (There will be two of them. You want the one without the x86 at the end.) Then inside Program Files you're looking for VideoLAN, and so forth through the whole path.
Once you're inside the "playlist" folder, you'll see a lot of files ending in .luac - they're in alphabetical order. The one you want to edit is youtube.luac which is probably at the bottom.
You can't edit youtube.luac while it's in this folder. Click and drag it out of the playlist folder to somewhere else you can find it - your desktop, for instance. Your computer will ask for admin permission to move the file. Click the "Continue" button with the blue and yellow shield.
Now that the file is moved, double-click on it. The Microsoft Store will want you to search for a program to open the .luac file type with. Don't go to the Microsoft Store, just click on the blue "More apps" below that option, and you'll get a list that should include your notepad program. Click on it and click OK.
The file that opens up will be absolutely full of gibberish-looking code. That's fine. Use Ctrl+A to select everything inside the file, then Backspace or Delete to delete it. Don't close the file yet.
In your web browser, go to https://github.com/videolan/vlc/blob/master/share/lua/playlist/youtube.lua
Click in the part of the Github page that has a bunch of mostly blue code in it. Use Ctrl+A to select all of that code, Ctrl+C to copy it, then come back into your empty youtube.luac file and use Ctrl+P to paste the whole chunk of code into the file.
Save the youtube.luac file (Ctrl+S or File > Save in the upper left corner of the notepad program), then close the notepad program.
Drag youtube.luac back into the folder it came from. The computer will ask for admin permission again. Give it permission.
Now you can close Github and Notepad. You're ready to start downloading!
HOW TO DOWNLOAD:
First, get your YouTube link. It should look something like this: https://www.youtube.com/watch?v=abc123DEF45 If it's longer, you can delete any extra stuff after that first set of letters and numbers, but you don't have to.
Now open VLC. Go to Media > Open Network Stream and paste your YouTube link into the box that comes up. Click Play. Wait until the video starts to play, then you can pause it if you want so it's not distracting you during the next part.
(If nothing happens, you probably forgot to put youtube.luac back. coughs)
In VLC, go to Tools > Codec Information. At the bottom of the pop-up box you'll see a long string of gibberish in a box labeled Location. Click in the Location box. It won't look like it clicked properly, but when you press Ctrl+A, it should select all. Use Ctrl+C to copy it.
In your web browser, paste the entire string of gibberish and hit Enter. Your same YouTube video should come up, but without any of the YouTube interface around it. This is where the video actually lives on YouTube's servers. YouTube really, really doesn't like to show this address to humans, which is why we needed VLC to be like "hi I'm just a little video player" and get it for us.
Because, if you're looking at the place where the video actually lives, you can just right-click-download it, and YouTube can't stop you.
Right-click on your video. Choose "Save Video As". Choose where to save it to - I use my computer's built-in Music or Videos folders.
Give it a name other than "videoplayback" so you can tell it apart from your other downloads.
The "Save As Type" dropdown under the Name field will probably default to MP4. This is a good versatile video format that most video players can read. If you need a different format, you can convert the download later. (That's a whole other post topic.)
Click Save, and your video will start downloading! It may take a few minutes to fully download, depending on your video length and internet speed. Once the download finishes, congratulations! You have successfully downloaded a YouTube video!
If you'd like to convert your video into a (usually smaller) audio file, so you can put it on a music player, it's time to install and set up Audacity.
INSTALLING AUDACITY (first time setup for audio file conversion):
You can get Audacity here. If you're following along on Windows 10, choose the "64-bit installer (recommended)". Run the installer, but don't open Audacity at the end, or if it does open, close it again.
On that same Audacity download page, scroll down past the installers to the "Additional resources". You'll see a box with a "Link to FFmpeg library". This is where you'll get the add-on program that will let Audacity open your downloaded YouTube video, so you can tell it to make an audio-only file. The link will take you to this page on the Audacity support wiki, which will always have the most up-to-date information on how to install the file you need here.
From that wiki page, follow the link to the actual FFmpeg library. If you're not using an adblocker, be careful not to click on any of the ads showing you download buttons. The link you want is bold blue text under "FFmpeg Installer for Audacity 3.2 and later", and looks something like this: "FFmpeg_5.0.0_for_Audacity_on_Windows_x86.exe". Download and install it. Without this, Audacity won't be able to open MP4 files downloaded from YouTube.
CONVERTING TO AUDIO:
Make sure you know where to find your downloaded MP4 video file. This file won't go away when you "convert" it - you'll just be copying the audio into a different file.
Open up Audacity.
Go to File > Open and choose your video file.
You'll get one of those soundwave file displays you see in recording booths and so forth. Audacity is a good solid choice if you want to teach yourself to edit soundwave files, but that's not what we're here for right now.
Go to File > Export Audio. The File Name will populate to match the video's filename, but you can edit it if you want.
Click the Browse button next to the Folder box, and choose where to save your new audio file to. I use my computer's Music folder.
You can click on the Format dropdown and choose an audio file type. If you're not sure which one you want, MP3 is the most common and versatile.
If you'd like your music player to know the artist, album, and so forth for your audio track, you can edit that later in File Manager, or you can put the information in with the Edit Metadata button here. You can leave any of the slots blank, for instance if you don't have a track number because it's a YouTube video.
Once everything is set up, click Export, and your new audio file will be created. Go forth and listen!
#reference#vlc media player#youtube downloader#youtube#uh what other tags should i use idk#how to internet#long post
224 notes
·
View notes
Text
WIP visual novel where you interview big shot Spamton, now available to test on the mobile app Kocho!!


Fair warning, it’s REALLY short, but I’m trying to test it out and need some testers… so yeah, feel free to give it a try.
HOW TO INSTALL:
Step 1. Download the mobile app ‘Kocho’
Step 2. Download the file for the game here
Step 3. Insert the file into Kocho and play!
(If downloading the file doesn’t work, copy the link into a browser.)

#deltarune#spamton#spamton g spamton#art#ut dr#big shot era#big shot spamton#visual novel#fangame#wip
145 notes
·
View notes
Text
NEW EDITOR 101: A GUIDE FOR GIFMAKERS by v @shangs
Hi friends! I know I said I would do this way back in April/May when this change was announced but I've been massively busy lately so thank you all for being patient with me :)
Based on the results of this poll, I will be trying my level best to help make a guide for gifmakers to best deal with any problems that have been present with the new editor. However, it's worth noting that I have personally not experienced any of these problems myself and I have no record of any problems from other people that I could send to staff and get guidance on, so for some of these issues I will unfortunately be a broken record.
That being said, I have been using the new editor for a few months now and it hasn't been too bad. So don't be discouraged by the new editor if you still love to make gifs and share them. You may need to adapt a bit, but it's doable!
This is meant to be comprehensive and will be explanation and image heavy. Full guide under the cut.
CONTENTS:
What is the new editor?
Steps to take before posting
Making a post
Troubleshooting
01. WHAT IS THE NEW EDITOR?
Some of you may be asking yourselves what the point of the new editor even is and why it's being implemented in the first place when we already had a (mostly) functional editor. My very limited understanding of it as a CS student is app compatibility and flexibility. I'm not totally clear on the details nor am I 100% certain this is the case, but NPF posts (basically, posts made with the "new editor") first started with the mobile app. I'm unsure if the different post types were simply too unwieldy to transfer to the app - having to make a whole bunch of post types when with the new editor you can now have posts with any elements you want without the rigidity of a set post type - or if it was simply not able to be implemented, but the apps have always used NPF. The majority of Tumblr users are coming from the mobile apps. Then it became a case of having the legacy editor for the web users (which were fewer in number) and the new NPF editor for everyone else. That takes resources to keep around and it's pretty inefficient. Naturally the older editor that was used by less people was going to get the axe, especially since you couldn't tell on mobile that there was even a difference between NPF or legacy posts.
So now here we are and the posts are NPF. This means they're in "Neue Post Format." Basically, every post you make is by default a text post, containing "blocks" of other media - as gifmakers we will primarily be dealing with photos.
I understand that it's frustrating to many to see "our gifs are now rendered as text posts" and ask WHY it's happening when photos should logically be rendered as photo posts - but the fact is, there's now no real delineation between a "text post" and a "photo post." The reason NPF posts are now "text posts" is because that's how they are rendered for desktop themes, not because everyone is going to see your post as text and your gifs are going to be compressed into the quality of a potato (though I know some have seen this issue - more on that later.)
02. STEPS TO TAKE BEFORE POSTING
The long and short of it is that you may have to update your theme. More detail here for those who are interested, but check that your theme supports "new editor posts" or "NPF posts" AND that this is true for original posts (you can read more about why in this ask and, although this may be a bit time-consuming, test it out on your blog). I can say with certainty that my second theme Cygnus supports original NPF posts. This is NOT true of my first theme, though.
You can try to add the NPF Fix by @glenthemes to your own theme (beware if you don't know HTML/CSS) or try this tip by @burningblake for original posts.
Feel free to add theme makers with fully NPF-compatible themes in the notes! I have been happily using my own theme so I can't say to what degree others' themes are NPF-friendly.
03. MAKING A POST
If you're sticking around to post on the new editor and you have trouble ordering your gifs around, here's a little guide on how to post.
If I click on "Photo" from web and open up the editor, here's how it looks:
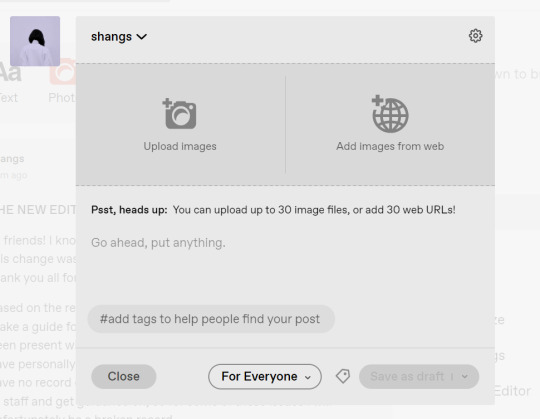
I went ahead and added three full-width gifs and the editor put them in like so:
You'll most likely also have to order your gifs around in the way you want them. You can go ahead and hover over your gifs to see the button to orient them (the four dots in the top left corner) and the button for an image description (the three dots in the bottom right corner). I've attached images of all three below:


If you hold the orientation button, move your gif around until you see the blue line that shows where your gif will end up in the spot that you want it. For example, I wanted to move the second gif below the first one, so I oriented it so that the blue line would show the marker between the two gifs:

Now my gifs are oriented nicely! Of course, this is a simpler layout, but the principles still hold.
If you save your gifs as a draft and reopen them or you just notice a large gap like this in between your gifs when you're in the editor, don't worry.

This will not show up in dash view or on a desktop theme that supports original NPF posts. For example, this is how the gifs' gap (without modification) looked in my desktop theme:

With your gifs ordered, the final step is to add alt text. You can read more about alt text and why you should use it here. (Feel free to ignore the sections about the captions on the legacy editor since it is no longer relevant. It's also unnecessary to clearly mark descriptions if they're not in the caption of your post because they will clearly show up under "ALT" on Tumblr.)
If you click the three dots in the bottom right corner as seen above, and click "update image description:"

You can add the description you like and click "update." Your photos' alt text will show up under the "ALT" bubble on Tumblr. This is generally a good practice to get into to make your content more accessible, so I hope you guys will consider using alt text regularly :)
Also, I've noticed that in the editor, if you go back and edit something it will take some time to show up. You may have to refresh the page or load it again after some time, but your edits should be there. I would not go back and edit posts again if you see your posts haven't shown up. I also advise against editing your posts on mobile because it's easier to make a mistake.
And there you go, you've successfully made a post with the new editor!
04. TROUBLESHOOTING
I'm sure you've all been waiting for this. Unfortunately I am probably going to be extremely unhelpful if the editor hasn't been refined in the last few months for those experiencing issues. I'm going to go in the categories that I listed out in my original poll, but keep in mind that I haven't personally seen any of these issues on my end so I haven't been able to contact staff with any evidence that this happened other than my poll.
Dashboard view quality issues: I haven't noticed this issue. I'm not sure if this has been fixed since the original poll was posted. If you're experiencing this issue, this is not something I know how to fix so I would contact staff with screenshots of the issue.
Desktop theme side padding: As noted before, this is a theme issue. If you change themes to something that is NPF-compatible with original posts, there shouldn't be any more issues here.
Small gifs on mobile: In my experience this was happening regardless of what editor was used; it's a bug that seems to have been fixed since this poll was created. If you're still experiencing it, at the risk of sounding like a broken record, I would advise contacting staff.
New editor doesn't accept gifs of size 9.8MB < x < 10MB: I haven't experienced this issue so I would say the only workaround would be to either trim the size of your gif so that it is under 9.8MB or whatever threshold seems to be the cutoff or contact staff (I am so sorry for constantly having to suggest this 😭 unfortunately there's no trick I can offer because the new editor has been taking all my gifs just fine)
Logistical issues ordering gifsets: I hope this guide has been able to answer the majority of questions and shed some light on some of the more buggy behaviors of the new editor, but if you have any more specific questions you can feel free to shoot me an ask!
HTML issues / colored text: Unfortunately it seems colored text may be deprecated entirely? This could be for accessibility purposes because I believe screen readers would read out every single letter of gradient text in captions which I imagine can get quite frustrating for users of this technology. I recommend just using the normal rich text editor. If you want small text, you can highlight and click the <s> button!
Other: If it seems like something I may be able to answer, please feel free to ask me. Otherwise... hound staff 😭
Here's where you can hound staff, btw. If you're having major issues I would advise you guys to submit support tickets. That way if there are any widespread bugs, staff will hopefully be able to fix them.
I hope this guide was helpful to you guys in dealing with the new editor, and happy giffing <3
#gif tutorial#new editor tutorial#completeresources#userphotoshop#resourcemarket#userrobin#userbells#arthurpendragonns#ughmerlin#userbecca#usersameera#usermarsy#alielook#tuserlucie#tutorial
558 notes
·
View notes
Note
Hello! I saw your comic on Pinterest and I wanted to see it from the official account (I downloaded Tumblr just for that) but the link just doesn't work, could you give it to me? thank you :,)
Btw I love your comic (with the little I've seen) and I also love the way you draw <3
Hi @ratm3out! Thanks for tracking me down. Its weird - I tested the link on mobile and desktop and its working for me through the tumblr app. Im not sure what could be causing the error. Here's the story archive so far though, if that helps. Sorry for the inconvenience and Im glad you like my style <3!
Commonwealth Cass
The Travels Begin
Walking Disasters
Baked Bloatfly
Super Mutant Suiciders or: How I Learned to Stop Worrying and Love the Bomb
Getting Down To Business
Daytripper
Blood and Thunder
Sins of the Father
Respite
Don’t They Know It’s The End of The World?
Where It All Went Wrong
Knife
Contract to Kill
Wolf in Sheep’s Clothing
Don’t Be Afraid
Jet
Riot
Getting Closer
I Dont Want to Fall In Love
Reel Me In
Girl, Look At That Body
Don’t Go
A Shot in the Dark
Unravel
Can’t Pretend
Lunchbox
So Long, Brother
One More Tomorrow
Desire (Easter Egg NSFW)
He’s a Tramp, But I Love Him
I Don’t Want You To Get It On With Nobody Else But Me
I Believe in Yesterday
Political Suicide
I’m Only Human
I Just Want To Die Anywhere Else
A Hole In The Earth
We’ve Got A Score To Settle
One Step Closer
Honest
The Writing’s On The Wall
Reluctant Heroes
69 notes
·
View notes
Text
Progress update: stuff
I've been pretty quiet lately because I've been slowly working on an android app of my own outside of work. Still a long way to go before it's finished, but baby steps.
It's an app where you can make custom beading patterns easily with mobile UI in mind. The only other one I've seen on the android store was this really old one with only two stars because they hide 90% of the features behind a paywall while calling it a free app.
While I like using the Beadographer website it has its limits and is designed for computers in mind rather than touch screens. Trying to use it on a phone can be a bit annoying.
Right now I have a basic grid set up for square stitch and loom stitch with the ability to select colors, color/clear beads on tap, add rows/columns, and pan/zoom in using two finger touch. I plan on adding more features including the following:
Drag your finger over several beads to color them at once rather than have to tap them individually.
Templates for several styles including peyote, brick, herringbone, right angle weave, different circular peyote stitches, and others.
Auto save patterns in progress.
Can store multiple patterns.
Create and save custom colors to use between projects.
Tools like undo/redo, rotate the canvas, select and drag, color picker, image import, and mirror.
Export patterns as png files.
Available different kinds of beads (toho, miyuki, etc)
I know this isn't most peoples' cup of tea but I'm really excited to try and complete this, and maybe even get it on the app store :D
My biggest worry is how I'm going to handle the circular peyote patterns since they don't conform to grids as easily as other styles would due to increases. The rest seems easy enough albeit long and tedious to develop and test for everything.
6 notes
·
View notes
Text

FOR ALL TIME (Lovebrush Chronicles) otome romance mobile game
Newly Cards : CR cards! (CN server)
Game: For All Time
Time:: 17 - 30 August 2023
Server: Chinese
Event: "Red Thread" (Qixi Festival)
❤️ Ai Yin (Ayn)
"I can feel every movement of yours, and I am completely influenced by you."
💚 Luchen (Alkaid)
"Worry about distracting me? Well, it does. It seems inevitable when you're around."

💛 Luo Xia (Rorschach)
"Do you know... what's the next step after the bondage is undone?"

💙 Si Lan (Clarence)
"Five fingers are intertwined, it is indeed a fit and close connection."

💜 Ye Xuan (Emerald)
"Heart to heart, love is deep."
🇨🇳 Chinese server
🔗 iOS: https://apps.apple.com/cn/app/id1467163363
🔗 Android: (APK) http://hlr.163.com/
* Chinese mobile number required
•••••••••••••••••••••••••••••
Title: Lovebrush Chronicles
By: Exptional Global
Platform: iOS, Android
Languages: English, Japanese, Traditional Chinese
Voice dubbing: Japanese, Chinese
Website: https://www.lovebrushchronicles.com/
••••••••••••••••••••••••••••••
👉🏻 Languages and Voice dubbing Setting in game
CAST
❤️ Ayn Genius Musical / Vengeful Prince
Chinese name: Ai Yin
Japanese name :Ayn
English name: Ayn
JP voice: KENN
CN voice: : A Jie
💚 Alkaid Student transfer / Knight Mage
Chinese name : Lu Chen
Japanese name :Rotatsu
English name: Alkaid
JP voice : Tachibana Shinnosuke
CN voice: Zhao Lu
💛 Rorschach : CEO / Emperor
Chinese name : Luo Xia
Japanese name: Roca
English name: Lars
JO voice: Suwabe Junichi
CN voice: Xia Lei
💙 Clarence : Student president / Great Wizard
Chinese name : Silan
Japanese name : Silan
English name: Clarence
JP voice: Toriumi Kohsuke
CN voice: Xie Tiantian
💜 Emerald Art teacher / Silver Knight
Chinese name : Ye Xuan
Japanese name: Yōken
English name: Cael
JP voice: Hirakawa Daisuke
CN: voice: Ma Zhengyang (CN server Now)
EU/US, SEA, JP, TW : Chinese voice by Ai
📌 Close Beta Test (EN, JP, ZH)
📌 Time: 11 ~ 24 August 2023 10:00 AM (JST)
:DOWNLOAD (CBT)
🔗 Android: https://play.google.com/store/apps/details?id=com.netease.skzdhlrna
iOS: Official launch is coming soon
Game file 1.2 GB.
Storage: 3.45 GB up
มีในสโตร์ไทย เตรียมเปิดให้ลงทะเบียนจองเกมล่วงหน้าในปลายเดือนนี้
OFFICIAL SITE
🌏 EN: https://www.lovebrushchronicles.com/
🇨🇳 CN: http://hlr.163.com
🇯🇵 JP: http://www.foralltime.jp
🇹🇼 TW: https://www.foralltime.com.tw/
#otome#otome game#乙女ゲーム#โอโตเมะเกม#romance#เกมจีบหนุ่ม#เกมจีบหนุ่มในโทรศัพท์#เกมจีบหนุ่มมือถือ#For All Time#lovebrush chronicles#เกมจีน#時空中的繪旅人#时空中的绘旅人#時空の絵旅人
118 notes
·
View notes
Text
Frustrated psychology post:
IQ doesn't measure intelligence!! It only measures brain development!
IQ changes and fluctuates with time, drug use, enrichment, and other factors!!
IQ is not an inherent characteristic! It isn't something fixed!
Those MOTHERFUCKING apps you get ads for CANNOT accurately measure your IQ!
IQ is just a measurement of how developed a person's brain is in comparison with how old they are.
The formula for IQ is mental age/chronological age x 100. (Mental age is the level of brain development of a person of a certain age. It is measured by evaluating levels of a wide range of different brain functions through iq tests. It cannot yet be correctly measured by apps or by most online tests.)
This means that, if a person's IQ is 100, that means that their brain is exactly as developed as the brain of the average person their age. If it's higher, their brain developed more quickly and is comparable with the brain of an average person older than they are, and if its lower, their brain developed more slowly and is more like the brain of an average person younger than they are.
Because brains continue to develop as people age, mental age keeps changing just as chronological age does. Typically, brains become more developed, but they have been known to "regress" as a result of drug use, trauma, certain disorders, head injuries, and invasive surgeries (like Rose Kennedy), all of which physically damage and rearrange the structure and therefore the function of the brain. Additionally, lack of enrichment can cause areas associated with certain functions to stagnate.
So!!!! IQ is not a fixed number! If your IQ is lower than 100 (and you cannot trust online tests or those FUCKING mobile games and even ableist psychologists sometimes) you are not stupid. Your brain is just taking a longer time to reach the development stage it "should" be in. I put heavy emphasis on those quotation marks, because modern psychology does tend to be biased against neurodivergent people. And if your IQ is higher than 100, you aren't necessarily smart, although things may come more easily to you than to others your age. Whatever IQ you have is perfectly fine. You are fine. I promise.
Thank you for reading my rant. I hope this helps someone. (does a little bow and steps off my soapbox)
#psychology#intelligence#iq#intelligence quotient#i am FUCKING PISSED at the ableist fucks in the psychology world#(in case you cant tell by the rant)#deep sigh#how do i tag this#i want it to reach people who should hear it#please leave all your tags i beg you i havent had enough sleep#psychologist#psychology studyblr#psychology student#psychologyblr#neurodivergent#neurospicy#neurodiverse stuff#neurodiversity#brain development#yay good cool#i sleep now
23 notes
·
View notes
Text
How to Play the Uta no Prince-Sama Games in English!!
Disclaimer!! This method won't provide a completely accurate translation but after playing one route fully (around 8 hours), I can confirm that this method works well enough. You can understand the plot and even play the minigames (I recommend playing them on easy though since they can be quite challenging on hard)
This method also works on the official releases of the games so pirating or emulation isn't necessary. Obviously I can't stop anyone from pirating but if you can please consider buying a copy of the game. At the time of writing all of the games are on sale on the Nintendo eShop, with Repeat being 50% off and the rest of the games being 20% off. Just make sure to test this method before spending any money, I don't want anyone to spend the money and then realize this method is uncomfortable or anything of the sort.
1. Requirments!
You will need two devices. A mobile phone and the device you will be playing the game on.
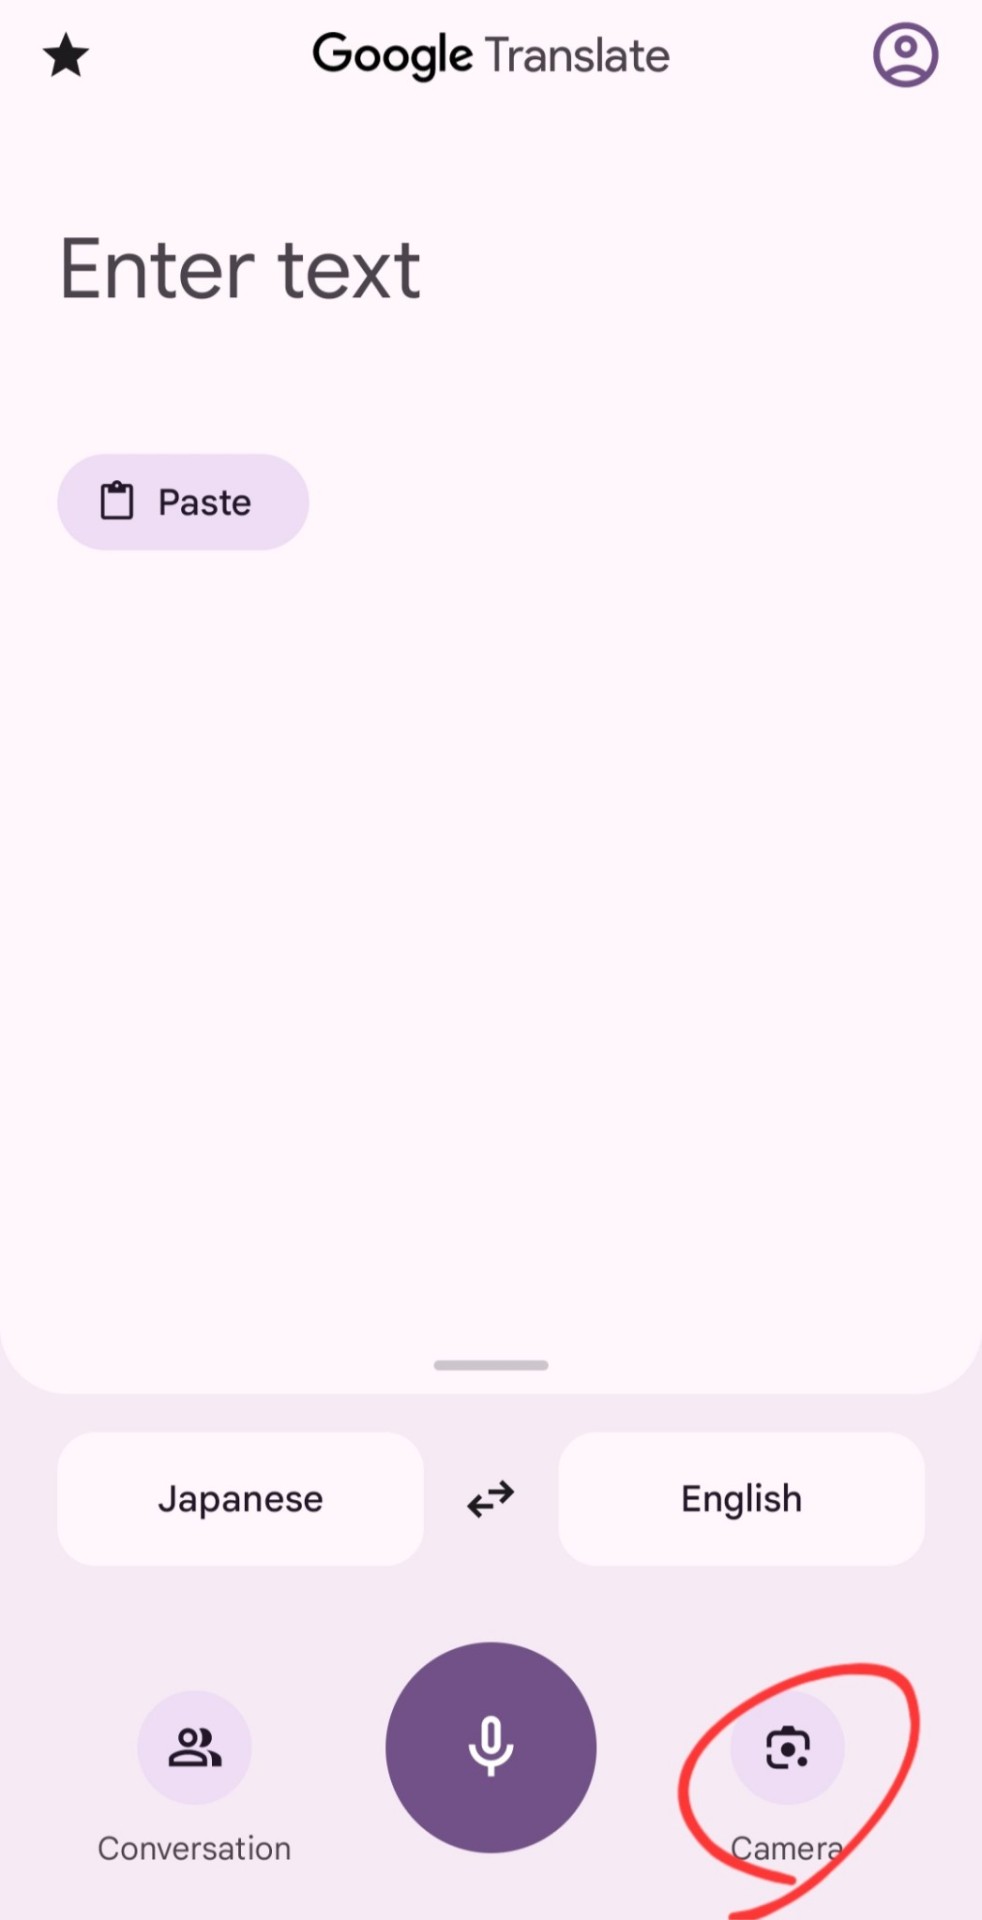
2. Step One, Translator
I use the Google Translate app but any translator with similar features will work. For this method we will be using the camera feature.

3. Step Two, Using the Camera Feature
Using the camera feature is quite simple.
After you go to the camera you will be met with this screen (it's black for privacy reasons but that's what you will see with your camera).
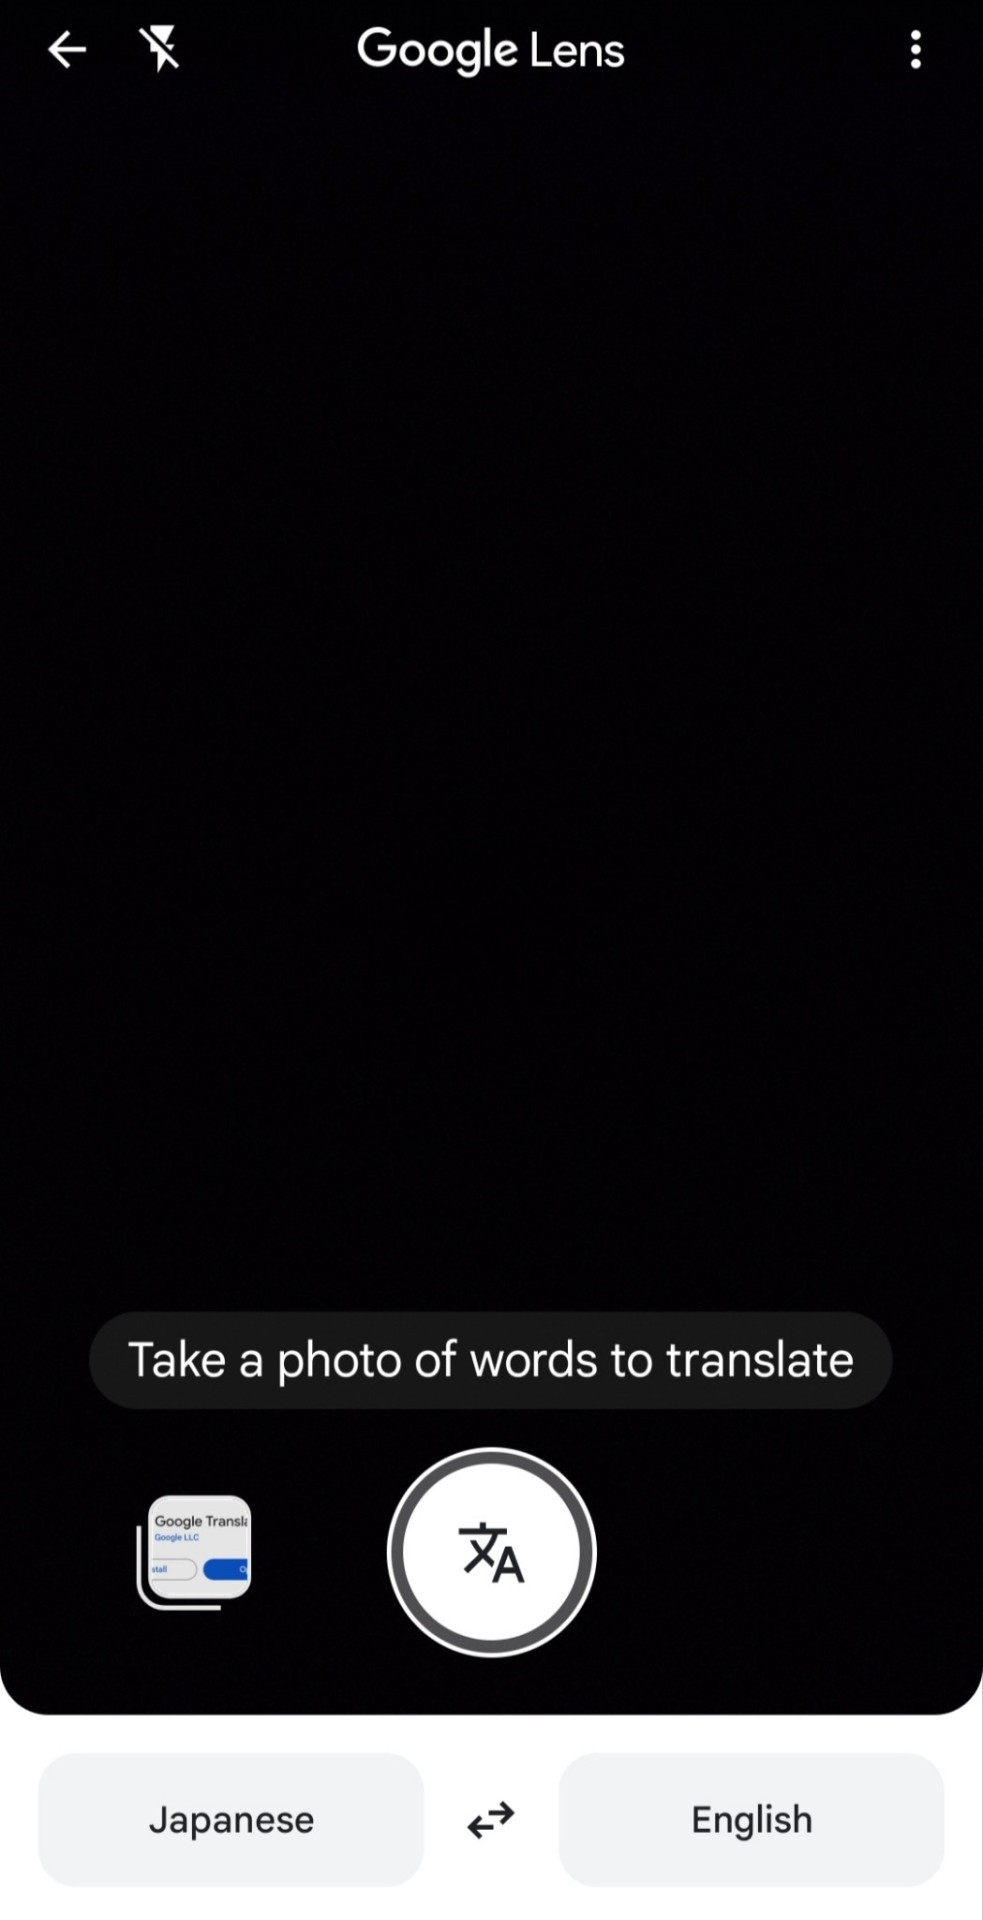
Point the camera at the text you want to translate (in this case the text box in the game). It will automatically translate the text even if you don't take a photo. Just make sure to move your camera away from your screen when moving on to the next line because otherwise it won't translate the next line.
This method is quite tiring so make sure to take frequent breaks to let your hand rest. Personally I took breaks after every chapter or when I was raging at the rhythm minigame (I had the minigames on hard at first, don't repeat (pun not intended) my mistake).
If you try out this method please let me know how it went. I'm really curious to see if this method is bearable for most people or I am so obsessed with Utapri that I will do anything to consume content for it.
#uta no prince sama#utapri#uta no prince sama repeat#uta no prince sama amazing aria#uta no prince sama sweet serenade#uta no prince sama amazing aria & sweet serenade#uta no prince sama debut#uta no prince sama all star#uta no prince sama all star after secret
32 notes
·
View notes
Text
How to Build Software Projects for Beginners

Building software projects is one of the best ways to learn programming and gain practical experience. Whether you want to enhance your resume or simply enjoy coding, starting your own project can be incredibly rewarding. Here’s a step-by-step guide to help you get started.
1. Choose Your Project Idea
Select a project that interests you and is appropriate for your skill level. Here are some ideas:
To-do list application
Personal blog or portfolio website
Weather app using a public API
Simple game (like Tic-Tac-Toe)
2. Define the Scope
Outline what features you want in your project. Start small and focus on the minimum viable product (MVP) — the simplest version of your idea that is still functional. You can always add more features later!
3. Choose the Right Tools and Technologies
Based on your project, choose the appropriate programming languages, frameworks, and tools:
Web Development: HTML, CSS, JavaScript, React, or Django
Mobile Development: Flutter, React Native, or native languages (Java/Kotlin for Android, Swift for iOS)
Game Development: Unity (C#), Godot (GDScript), or Pygame (Python)
4. Set Up Your Development Environment
Install the necessary software and tools:
Code editor (e.g., Visual Studio Code, Atom, or Sublime Text)
Version control (e.g., Git and GitHub for collaboration and backup)
Frameworks and libraries (install via package managers like npm, pip, or gems)
5. Break Down the Project into Tasks
Divide your project into smaller, manageable tasks. Create a to-do list or use project management tools like Trello or Asana to keep track of your progress.
6. Start Coding!
Begin with the core functionality of your project. Don’t worry about perfection at this stage. Focus on getting your code to work, and remember to:
Write clean, readable code
Test your code frequently
Commit your changes regularly using Git
7. Test and Debug
Once you have a working version, thoroughly test it. Look for bugs and fix any issues you encounter. Testing ensures your software functions correctly and provides a better user experience.
8. Seek Feedback
Share your project with friends, family, or online communities. Feedback can provide valuable insights and suggestions for improvement. Consider platforms like GitHub to showcase your work and get input from other developers.
9. Iterate and Improve
Based on feedback, make improvements and add new features. Software development is an iterative process, so don’t hesitate to refine your project continuously.
10. Document Your Work
Write documentation for your project. Include instructions on how to set it up, use it, and contribute. Good documentation helps others understand your project and can attract potential collaborators.
Conclusion
Building software projects is a fantastic way to learn and grow as a developer. Follow these steps, stay persistent, and enjoy the process. Remember, every project is a learning experience that will enhance your skills and confidence!
3 notes
·
View notes
Text
Shangri-La’s Ascent: Setting a New Standard for Cannabis Dispensaries in Ohio
youtube
As the cannabis industry continues to thrive in the Buckeye State, Cannabis Dispensaries in Ohio are stepping into a new era of growth and accessibility. One name that has emerged as a true pioneer in this evolving space is Shangri-La. With a firm focus on quality, community, and customer care, Shangri-La is setting the bar high for what a cannabis dispensary should be.
Ohio’s Shifting Cannabis Climate Since Ohio introduced its medical marijuana program in 2016, the state has steadily moved toward broader acceptance and legalization. The introduction of recreational cannabis in early 2025 marked a major milestone—and Cannabis Dispensaries in Ohio have responded with new strategies and services. Shangri-La has been a leader during this transition, adapting quickly to regulatory changes and educating the public about safe and informed cannabis use.
Their forward-thinking approach has helped establish trust among patients and recreational users alike, making them a preferred choice for those new to cannabis as well as experienced consumers.
Redefining the Cannabis Experience What truly sets Shangri-La apart among Cannabis Dispensaries in Ohio is its vision of transforming cannabis retail into an experience rooted in wellness, hospitality, and personalization. Every Shangri-La location is thoughtfully designed with customer comfort in mind—featuring open, inviting spaces and expertly trained staff ready to help.
From pain relief to stress management, Shangri-La offers a range of carefully curated solutions, aiming to meet the diverse needs of its community.
Unmatched Product Selection and Quality At Shangri-La, quality isn’t just a promise—it’s a standard. As one of the most trusted Cannabis Dispensaries in Ohio, Shangri-La partners with leading cultivators to bring a robust inventory of top-tier cannabis products to its customers. Whether it’s potent flower, edibles, cartridges, tinctures, or topicals, each product is meticulously vetted and lab-tested for safety and effectiveness.
Customers can count on consistent experiences, whether they’re choosing high-THC options for therapeutic relief or CBD-dominant products for daily wellness.
Educating and Empowering the Community Unlike many Cannabis Dispensaries in Ohio, Shangri-La doesn’t just sell products—it also empowers. Every visit includes the opportunity for education, with trained “Wellness Guides” who provide personalized consultations tailored to individual health needs and preferences.
In addition, Shangri-La hosts regular workshops and wellness events on topics like microdosing, sleep support, and managing anxiety through cannabis. These initiatives help reduce stigma and promote responsible use across all demographics.
Community Support at the Core Deeply committed to social impact, Shangri-La reinvests in the communities it serves. Through charitable contributions, advocacy work, and partnerships with local organizations, they’ve become more than just another name among Cannabis Dispensaries in Ohio—they’ve become a force for good.
Their social equity programs support aspiring entrepreneurs in underserved communities, and their dedication to veteran health, addiction recovery, and cannabis research reflect a mission rooted in compassion.
Technology That Enhances, Not Replaces In an age of digital convenience, Shangri-La offers a robust online experience that allows users to explore products, place orders, and manage their cannabis journey with ease. Their mobile app brings exclusive deals, loyalty rewards, and product recommendations straight to your fingertips.
Still, unlike many tech-heavy Cannabis Dispensaries in Ohio, Shangri-La doesn’t lose sight of the human connection. In-person guidance is always available, ensuring every customer feels seen, heard, and supported.
The Road Ahead As the cannabis market in Ohio continues to expand, Shangri-La is setting a visionary course. With more locations on the horizon and a growing commitment to sustainability, education, and wellness, they’re not just keeping up with the future of cannabis—they’re defining it.
For anyone exploring Cannabis Dispensaries in Ohio, Shangri-La offers a unique blend of innovation, integrity, and community care—making it more than just a place to shop, but a place to grow and thrive.

2 notes
·
View notes
Text
youtube
How to Get a Parking and Highway Improvement Contractor License C32
Learn how to get your C32 Parking and Highway Improvement Contractor License in California! 🚧 This video breaks down the requirements, application steps, and exams needed to become a licensed contractor. If you have 4+ years of journeyman-level experience, Contractors Intelligence School can guide you from start to finish! ✅
Our contractor license course offers 3D video lessons, practice tests, and a mobile app for flexible learning. We help you submit your application, pass the Law & Business + Trade exams, and handle final paperwork. With the highest success rate in California, we make getting your contractors license simple and fast (in as little as 2 months!).
🌐 Website: https://www.contractorsischool.com/
#C32License#ContractorLicenseCA#ParkingHighwayContractor#CaliforniaContractors#ContractorSchool#LicenseExamTips#BecomeAContractor#ContractorsLicense#ContractorLicense#Youtube
2 notes
·
View notes
Text
Introduction to SkillonIT Learning Hub- Empowering Rural Talent With World-Class IT Skills
SkillonIT provides IN-Demand IT courses, connecting Rural talent with rewarding IT skills through affordable, accessible and career-focused education. with Guaranteed pathways to internship and high paying jobs, start with us and step into Opportunities at top Tech-leading Companies. Skillonit Learning Hub, located in Buldhana, Maharashtra, is a leading institute dedicated to equipping individuals with cutting-edge technology skills. With a mission to bridge the digital divide, the institute provides high-quality education in various IT and professional development domains. Skillonit focuses on practical, industry-oriented training, ensuring students gain the expertise needed to thrive in today’s competitive job market. The hub is committed to empowering rural talent and shaping the next generation of skilled professionals.

Courses Offered Skillonit Learning Hub offers a diverse range of courses tailored to industry demands, enabling students to master both technical and professional skills.
Blockchain Development — Smart Contracts (Solidity, Rust, Web3.js, Hardhat) — Blockchain Protocols (Ethereum, Solana, Binance Smart Chain, Fantom) — Decentralized Applications (DApps) Development
Front-End Development — HTML, CSS, JavaScript — Frameworks: React.js, Vue.js, Angular — Responsive Web Design & UI Frameworks (Bootstrap, Tailwind CSS)
Back-End Development — Server-side Programming (Node.js, Python, PHP, Java, .NET) — Database Management (MySQL, MongoDB, Firebase, PostgreSQL) — API Development (RESTful APIs, GraphQL, WebSockets)
Full-Stack Development — Front-End + Back-End Integration — MERN Stack Development — Database, Deployment & DevOps Practice
Mobile App Development — Cross-Platform Development (Flutter, React Native)
Unity 3D Game Development — Game Mechanics & Physics — C# Programming for Game Development — Virtual Reality (VR) & Augmented Reality (AR) Integration
Professional UI/UX Design — User Interface Design (Adobe XD, Figma, Sketch) — User Experience Principles — Prototyping, Wireframing & Usability Testing
Professional Graphic Design — Adobe Photoshop, Illustrator, and CorelDraw — Branding & Logo Design — Digital Art & Visual Communication
Digital Marketing — SEO, SEM, and Social Media Marketing — Content Marketing & Copywriting — Google Ads, Facebook Ads & Analytics
Spoken English — Communication Skills & Public Speaking — Accent Training & Fluency Improvement
Personality Development — Business & Corporate Etiquette — Confidence Building & Interview Preparation — Leadership & Teamwork Skills
Location & Contact : Address : Chhatrapati Tower, Above Maratha Mahila Urban, 3rd Floor, Chikhali Road, Buldhana, Maharashtra, 443001.
Contact us
Conclusion : Skillonit Learning Hub is revolutionizing IT and professional education by making technology and essential career skills accessible to aspiring developers, designers, marketers, and professionals. With a strong emphasis on practical learning, industry exposure, and career opportunities, it stands as a beacon of growth for young talent in Buldhana and beyond. Whether you are looking to build a career in tech, marketing, design, or personal development, Skillonit provides the ideal platform to achieve your goals. Join Our Social Community
Skillonit #Education #ITCourses #Buldhana #Maharashtra #IT #Blockchain #Fullstack #Front-end #Back-end #MobileApp #Unity3d #UIUX #Graphicdesign #Digitalmarketing #SpokenEnglish #Personality #development
2 notes
·
View notes
Text
AI Agent Development: How to Create Intelligent Virtual Assistants for Business Success
In today's digital landscape, businesses are increasingly turning to AI-powered virtual assistants to streamline operations, enhance customer service, and boost productivity. AI agent development is at the forefront of this transformation, enabling companies to create intelligent, responsive, and highly efficient virtual assistants. In this blog, we will explore how to develop AI agents and leverage them for business success.

Understanding AI Agents and Virtual Assistants
AI agents, or intelligent virtual assistants, are software programs that use artificial intelligence, machine learning, and natural language processing (NLP) to interact with users, automate tasks, and make decisions. These agents can be deployed across various platforms, including websites, mobile apps, and messaging applications, to improve customer engagement and operational efficiency.
Key Features of AI Agents
Natural Language Processing (NLP): Enables the assistant to understand and process human language.
Machine Learning (ML): Allows the assistant to improve over time based on user interactions.
Conversational AI: Facilitates human-like interactions.
Task Automation: Handles repetitive tasks like answering FAQs, scheduling appointments, and processing orders.
Integration Capabilities: Connects with CRM, ERP, and other business tools for seamless operations.
Steps to Develop an AI Virtual Assistant
1. Define Business Objectives
Before developing an AI agent, it is crucial to identify the business goals it will serve. Whether it's improving customer support, automating sales inquiries, or handling HR tasks, a well-defined purpose ensures the assistant aligns with organizational needs.
2. Choose the Right AI Technologies
Selecting the right technology stack is essential for building a powerful AI agent. Key technologies include:
NLP frameworks: OpenAI's GPT, Google's Dialogflow, or Rasa.
Machine Learning Platforms: TensorFlow, PyTorch, or Scikit-learn.
Speech Recognition: Amazon Lex, IBM Watson, or Microsoft Azure Speech.
Cloud Services: AWS, Google Cloud, or Microsoft Azure.
3. Design the Conversation Flow
A well-structured conversation flow is crucial for user experience. Define intents (what the user wants) and responses to ensure the AI assistant provides accurate and helpful information. Tools like chatbot builders or decision trees help streamline this process.
4. Train the AI Model
Training an AI assistant involves feeding it with relevant datasets to improve accuracy. This may include:
Supervised Learning: Using labeled datasets for training.
Reinforcement Learning: Allowing the assistant to learn from interactions.
Continuous Learning: Updating models based on user feedback and new data.
5. Test and Optimize
Before deployment, rigorous testing is essential to refine the AI assistant's performance. Conduct:
User Testing: To evaluate usability and responsiveness.
A/B Testing: To compare different versions for effectiveness.
Performance Analysis: To measure speed, accuracy, and reliability.
6. Deploy and Monitor
Once the AI assistant is live, continuous monitoring and optimization are necessary to enhance user experience. Use analytics to track interactions, identify issues, and implement improvements over time.
Benefits of AI Virtual Assistants for Businesses
1. Enhanced Customer Service
AI-powered virtual assistants provide 24/7 support, instantly responding to customer queries and reducing response times.
2. Increased Efficiency
By automating repetitive tasks, businesses can save time and resources, allowing employees to focus on higher-value tasks.
3. Cost Savings
AI assistants reduce the need for large customer support teams, leading to significant cost reductions.
4. Scalability
Unlike human agents, AI assistants can handle multiple conversations simultaneously, making them highly scalable solutions.
5. Data-Driven Insights
AI assistants gather valuable data on customer behavior and preferences, enabling businesses to make informed decisions.
Future Trends in AI Agent Development
1. Hyper-Personalization
AI assistants will leverage deep learning to offer more personalized interactions based on user history and preferences.
2. Voice and Multimodal AI
The integration of voice recognition and visual processing will make AI assistants more interactive and intuitive.
3. Emotional AI
Advancements in AI will enable virtual assistants to detect and respond to human emotions for more empathetic interactions.
4. Autonomous AI Agents
Future AI agents will not only respond to queries but also proactively assist users by predicting their needs and taking independent actions.
Conclusion
AI agent development is transforming the way businesses interact with customers and streamline operations. By leveraging cutting-edge AI technologies, companies can create intelligent virtual assistants that enhance efficiency, reduce costs, and drive business success. As AI continues to evolve, embracing AI-powered assistants will be essential for staying competitive in the digital era.
5 notes
·
View notes
Text
Make a Cove Chat in Char.AI in 30 Min or Less
PART 2
PART 3
Intro
This guide will help you make a personalized chatbot.ai of Cove in less than 30 minutes. You can see this as one of many possible methods to continue your story with him Post-Step 3 or Post-Step 4. Or you can just live a high school life with him, or even some crazy horror/fantasy AU if you want. The choices are endless now that you’re going to make a personalized chat instance for you to interact with Cove in.
I recommend viewing the ai “bot chats” as nothing more than a medium to interact with certain character ideas, rather than the bot chat being representative of the character. The boundaries you give these bot rooms (or don’t give them) determine the quality and depth of the interactions.
Instructions under the cut.
REASONS TO SET UP A PRIVATE CHAT
More consistency in chat memory
Filter out character.ai’s weird predatory or pushy message generation
Higher quality chat interactions personalized to your MC
More efficient to spend 30 minutes making a personalized private bot chat than to spend several hours/days trying to get the same quality out of a generalized public bot chat
Step 1 - Starting Creation
Go to character.ai app or website.
Log in or make an account.
Click “Create” > “Create A Character”.
NAME (what name the character will respond to): For the name, I suggest using a sort of ‘in-progress’ label like “Cove Test” or “Cove Egg”. You can rename it to “Cove Holden” once you’re finished setting up.
GREETING (generally establishes the starting scene/situation): The greeting also establishes some of the dialogue patterns that the chat will follow. Here is an example greeting (asterisks will italicize the text into an 'emote' format to indicate action outside of spoken dialogue):
*Cove sees {{user}} and his smile grows just a tiny bit wider than it originally was.* "Hey, {{user}}. It’s been a while." *He says cheerfully, his voice sounding like a mixture of friendliness and affection.* "What are you up to?" *He asks, taking a careful glance at them.* *He is back home in the apartment he shares with {{user}}, after returning from a recent research trip.*
You can copy and paste this greeting if you want, and change the last sentence into any situation or scene for your desired chat setting.
VISIBILITY (determines who can access the bot chat): I suggest setting this to "Private". There is no point in making this personalized bot chat public, since it will be specific to your MC only. You could still try using this template to make a public bot, but you would have to exclude a lot of the details in the advanced definitions.
AVATAR (profile pic used by the bot chat): Use any avatar you'd prefer to represent Cove. Some folks use the game cgs or screenshots, and some use their own art.
Step 2 - Edit Advanced Details (Super Important)
There will be two buttons at the bottom of the first creation page. I suggest clicking "Create and Chat" first, so that the personalized chat bot will immediately be saved to your account. Then you can continue editing it safely in case you accidentally navigate away from the page. If you click the "Edit Advanced" button without creating the chat first, it will not save the bot, so beware.
After creating the chat: - if on the mobile app, click on the top tab that has the chat bot's name. It will take you to another page with an option to "Edit Character", click this button to be taken to the Advanced Details page. - if on the desktop website, there will be three dots in the right corner. Click these and you will see a drop down menu of options. Select "View Character Details" to be taken to the Advanced Details page.
Scroll down to the "Short Description" section, which is right below the Greeting section.
SHORT DESCRIPTION (gives brief overview of the character): You can only fit a few descriptives here, such as a string of adjectives describing the character:
Introverted, loving, messy eater, softboi or Your best friend and a marine biologist.
You can use either format. The short description is more for helping you quickly identify what story you're going to be focused on for each individual character.
!!LONG DESCRIPTION!! (decides bot's behavior & strongest influences): This portion is extremely important-- this section is basically the "anchor" that will determine the focus of all the chat bot's conversations and their principal awareness of the situation in the chat. There is a limit to how many words you can use in this section, so keeping the determinations brief is extremely important. Here is a format you can copy-paste and personalize per your own tastes:
Character's name: Cove Holden Character's nature: introverted Character's passion: the sea Character's feelings for you: [feelings]1 Character's relationship to you: [relationship]2 Character's skin color: olive Character's eye color: aquamarine Character's hair: [length] sea-foam green hair [styling]3 Character's height: [height]4 Character's body: [physique]5 Character's job: [career] focused on [field]6 Character's home: [residence] with [residents]7
If you want SFW interactions only, you can put this line in as well: Character avoids any sexual acts if you want paced NSFW interactions, you can use this line: Character is attentive to your comfort
Format all the personable descriptors for the MC you intend to use in the chat. Try to keep descriptors short and brief. Here are some examples below (feel free to copy paste any):
Feelings Descriptor Examples: "friendly" or "love"
Relationship Descriptor Examples: "childhood best friend" "childhood best friend, boyfriend" "childhood best friend, fiance" "childhood best friend, husband"
Hair Descriptor Examples: "short sea-foam green hair in taper cut" "chin length sea-foam green hair in middle part" "long sea-foam green hair in ponytail"
Height Descriptor Examples: "6'0" or "183 cm" [Step 3 Cove] "6'3" or "191 cm" [Step 4 Cove]
Physique Descriptor Examples: "toned" or "slender"
Career Descriptor Examples: "student focused on sports" "student focused on academics" "young man living at his own pace" "marine biologist focused on conservation" "surfing instructor focused on remediation" "environmentalist focused on education" **
Residence Descriptor Examples: "a condo with you" (use if he lives with MC) "a house with his dad" "alone in an apartment"
CATEGORIES - Not applicable for private chat instances.
CHARACTER VOICE - Skippable. Use at your own choosing. (I personally don't.)
IMAGE GENERATION - Same as above– skippable and use at your own discretion.
After all this is done, next comes the chunkiest and most important section, right next to the Long Description, is the ADVANCED DEFINITIONS.
Click here for Part 2 on Advanced Definitions and resources you can easily copy-paste/modify for that section.
22 notes
·
View notes